Ankle Mobility

When you have limited ankle mobility, we make it a priority to improve that mobility. That’s because improved ankle mobility can boost performance and decrease injuries such as knee pain and hip pain.

If you already know you have tight calves or tight ankles, you might be thinking of stretching. However, muscles are usually tight for a reason (protection, improved strength, etc). Stretching often doesn’t do the trick. Foam rolling can help as well, but both stretching and foam rolling probably leave you wondering why things always tighten back up.

In the video below, we show you two important exercises that might be missing from your routine to increase your ankle mobility for good and allow you to truly take off with your running.

Cadence

This week we're talking more about running form, specifically cadence.

What is Cadence?

Cadence is the amount of time your foot strikes in the ground in a minute.

Why does Cadence Matter?

A lower cadence (less steps per minute) has been associated with higher forces being placed on the body, which can lead to injuries or loss of performance.

Small changes in cadence from 5-10% have been shown to reduce forces that may improve performance or decrease risk of injury.

Who might benefit from changing their cadence?

There is no ideal cadence. If you have had injuries like shin splints, Achilles Tendinopathy, Stress Fractures, knee pain, or IT Band syndrome and have a low cadence, you may benefit from changing your cadence. At Omega Project, we determine this using 3D gait analysis. In addition to cadence retraining, there may be other cues that would benefit you more than changing your cadence. However, cadence retraining is a relatively low risk change to try.

How do I measure my cadence?

Count the number of times your foot hits the ground in 1 minute (it's easier to count just the left or just the right) and then multiply that by 2. You should expect a number between 150-180.

How do I change my cadence?

You will want to increase your cadence between 5-10%. Multiple your current cadence by .05-.1 and add that to your current number. You can set a metronome to this number or have Spotify play songs that matches the beat. Garmin watches also have a vibrating metronome to help you set your cadence. The goal is to maintain the same speed while you increase your cadence.

Why Are You Kicking Yourself?

Ever get back from a run and wonder why the insides of your legs are so scuffed and muddy? Maybe this even happens while you walk? On the surface level, it can lead to some extra scrubbing in the shower or wear-and-tear on the shoes, but the "heel whip" that causes you to kick the inside of your leg has been shown to be associated with increased risk of tibial stress fractures, achilles tendonitis, plantar fasciitis, and other injuries.

Here are the top 3 things to blame for kicking yourself:

1. YOUR FEET

Collapsing at the feet generally means overpronating. Pronation is a normal part of the gait cycle. However, re-supinating is also important to get the foot back to a stable position so it can efficiently push off. When this doesn't happen on time, it can mean that your feet are weak or hypermobile, but not always. Sometimes over-pronating can come from limited ankle range of motion (dorsiflexion) or limited great toe extension. We compensate by collapsing inward to "get around" the limited motion. As we get toward the end of the stance phase and get ready to toe-off, the resultant forces cause the heel to "whip" inward, thus the brushing of your foot against the other leg.

2. UP THE CHAIN

Weakness in the stabilizers of the hip can cause a collapsing of the hips, knees, and feet during the shock-absorption phase of gait. This contributes to the foot pronation that we mentioned above. This is why it's important to know what the source of your pronation is because it's often not a simple solution of getting arch supports or stability shoes. If your foot/ankle is still tight or your hips are still weak, you're not solving the right issue.

Another source of heel whip at the hip is a tight TFL (the muscle at the front of your hip that attaches into the ITB), a tight lateral hamstring, or a tight lateral gastroc (calf muscle).

Finally, things that cause your pelvis to rotate while you run such as limited hip extension or limited thoracic rotation (the sway or rotation of the pelvis makes up for the lost motion elsewhere), can cause you to kick the inside of your leg.

3. YOUR RUNNING FORM

Even if you work on your specific limitations, you may end up using the same old gait pattern. When we're looking to change your running pattern, we prescribe drills and ONE simple cue while you run to help change the motor pattern. For this issue, we often work on knee drive. Increasing knee drive during your swing phase can help set you up for better alignment and force attenuation when your foot hits the ground.

WHEN KICKING YOURSELF IS NOT A PROBLEM

It's important to note that muddy or scuffed inner legs are not always an issue. When we run on trails, we are constantly adapting to the changing surface. To do so, we use both our foot/ankle and our hips. This might mean that alignment is not always perfect as we run over the uneven ground. Chances are, you're going to need a little extra scrubbing after a trail run, no matter how good your running form is.

Know Your Form: Knee Drive

Today we talk about a few drills that we have almost all of our runners do to improve their form and decrease injury risk: Marching and Wall Drill

Why? These drills can be effective for almost any type of runner (collapser, overstrider, weaver, etc) because they help improve knee drive. Proper knee drive during the swing phase of gait (when you bring your leg forward before it lands) sets the body up to appropriately absorb the forces of running during the landing phase. The knee drive also helps to align the body for when the foot hits the ground.

Marching:

Drive your knee forward as if you were kneeing a soccer ball (not juggling a soccer ball). The foot should follow the path of the opposite shin to the knee before coming back down to the ground about half-way ahead of the other foot. By now, you've shifted your weight even so slightly so that the foot is landing right below you. Repeat this as you slowly move forward, never getting your feet too far out in front of you. Stay tall and keep the standing leg straight. Follow the progressions shown in the video.

Wall Drill:

Start by standing arms length from the wall with your fingertips at shoulder height. Back up until your finger tips are at eye height and then go up on your toes. Lift one knee up toward the wall. Knees and toes should be pointed toward the wall on the left leg. The standing leg should be straight while driving through the glutes. Check that your hips are level and you are maintaining a good plank position (not arching the back). Follow the progressions shown in the video. When doing the quick exchanges shown in the progression, it can be helpful to put a piece of tape at eye level to help you avoid bouncing too much. Keep your eyes on the tape and try to keep it from going up and down in your visual field.

IMPORTANT NOTE:

The goal of drills is to change your motor pattern. They are not a race. They should be done slow, deliberately, and mindfully until you have enough control and awareness over the motion to speed it up.

Running Form & 3D Gait Analysis

This week we’re going to talk more about running form and what happens during midstance, the shock absorption phase of gait.

If your joints go through too much motion, we call this collapsing or valgus collapse. This can be due to limited foot stability, limited hip stability, or limited lumbopelvic stability (core stability).

You would suspect someone might be doing this if they show signs of this during squatting or single leg squatting, such as in the picture below.

At CATZ RUN, we use 3D gait analysis to confirm whether this might be happening during running as well. In addition to prescribing the warm-up and exercises, we also give runners cues to use while they are running to help change the pattern. This is a unique cue for each runner and may include driving the knees, increasing cadence, or focusing on keeping the pelvis even while running (i.e don’t let the soup spill out the top of your pelvis).

If you would like to learn more about your gait, please call to schedule a 3D Gait Analysis.

We are also having 3D Gait Screen Nights coming up soon (August 26 and September 3). This is an opportunity to have us take you through a quick 3D gait analysis. Although it is less comprehensive than our full 3D Gait Analysis, you can expect to get a 3D Gait Report and personalized plan that includes movement retraining, strength exercises, and more.

Can You Perform this Movement?

Before we look at someone’s running with 3D gait analysis, we always take the runner through what we call a “running readiness assessment.” We also use a modified version of this for athletes of other sports or those with different movement goals and pain in other areas of the body. The idea is that we get a thorough look at what the whole body is doing so we don’t miss something that might be causing a seemingly unrelated pain. For example, your shoulder pain may never get better with your overhead squats if you don’t address your limited ankle mobility.

With the running readiness assessment, we’re also looking at key movements that you should be able to accomplish in order to show us that you are fit to run. If you are lacking in any of these areas, we can prioritize exercises that would help you decrease pain and improve performance.

One of these movements is the single leg sit-to-stand. So today, we challenge you to try the single leg sit-to-stand!

For the single leg sit-to-stand, we are looking for:

  1. Your ability to complete 7 without putting your other foot down, without losing your balance, without holding on, and with a controlled landing during each rep.
  2. Your ability to maintain alignment through your hip, knee, and foot/ankle.

The reason this move is so important is because it has been shown that your ability (or lack of) to perform this movement with good alignment is a good indicator of what you might look like at mid-stance of running. Mid-stance is our “shock absorption” phase of gait. If you are not strong enough to complete the sit-to-stand, you may present with a stiff knee during mid-stance (which can lead to things like joint pain in the knee, hip, or back and early onset of arthritis, especially after injuries such as ACL reconstruction).

You may also present with a knee/leg that moves too much. An example of this is in the picture below and it is called collapsing. When we see this motion during your sit-to-stand, even if you had the strength to complete 7, there’s a strong possibility you’re doing this while you’re running. Shin splints? Arch pain? Knee pain? ITB pain? Collapsing mechanics might be the cause of these pains, among many other running pains and injuries.

There are simple ways to correct these things. Snap a video of yourself doing the single leg sit-to-stand and tag us on Instagram @omegaprojectpt OR reply to this email. We’ll send you our feedback and some advice for improvement!

4 Things That Are Holding You Back From Healing

Are you frustrating by continued injuries, aches, and pains? Here, we discuss 4 things that could be holding you back from healing and feeling your best.

SLEEP The majority of our recovery happens while we sleep. During workouts and stressful days, we breakdown. During sleep, we gain the benefits of the workout and recover from the day. It's more than that, though. Sleep is good for the immune system, muscle recovery, and bone health (among many other things) because of the processes that happen specifically while we sleep. It is recommended that high schoolers sleep between 8-10 hours a night. For adults, 7-9 hours of sleep is recommended.

NUTRITION The best thing you can do regarding nutrition is simply just eat enough, especially if you're very active! If you burn more calories than you take in it can severely affect your performance and health. It's important to get a balance of protein, complex Carbs, and healthy fats. Some important nutrients that are often low are Vitamin D (for bone, immune, and mental health) and Magnesium (for nerve and muscle health). If you're consistently injured, fatigued, or sick, getting proper blood work should definitely be one of the first steps to make sure your body has what it needs to heal.

STRESS Our body's response to stress is to produce cortisol. This happens whether it's good stress (exercise) or typical stress (work, finances, etc.). If you have stress coming from too many places at once, the constant flow or cortisol can cause a cascade of issues in the body. Eventually, your body will force you to take a break (sickness and injury or decreased performance). Gentle yoga, taking walks, and taking a break are just a few examples of ways to manage stress. To read more about stress and running, click here: www.OmegaProjectPT.com.

STRENGTH Our brain plays an important role in the presence of tight muscles and nagging joint pain and stiffness. If the brain does not feel safe in a certain position, it will not let you go into that position. In other words, if you are not strong enough, your muscles will tighten to protect the joint or muscle. This is why things like stretching and massage might feel good, but don't seem to last. It's always important to follow up with exercises that strengthen the area in its full range of motion. Strength also plays a valuable role in bone health. It's perhaps the number one thing you can do to prevent bone density loss. Preventing loss of mobility and bone health sounds like an anti-aging superpower to us!

Cushioned Shoes

Have you been thinking about getting more cushioned shoes? Here are some things to consider.

When to get more cushion:

Beneficial to help absorb shock when the joints are unable to do so (i.e. knee arthritis, stiff joints that can’t be improved with exercises or rehab)

Beneficial for long standing hours on hard surfaces (i.e. nurse/doctor, teacher)

When you need to KNOW MORE before getting more cushion:

If you’re saying: “My back hurts” “My knee hurts”

If you’re saying: “I feel like I need more cushion”

Why do you need to know more before getting a more cushioned shoe?

Our feet provide valuable feedback between the ground and our brains. In fact, they provide the only feedback between the ground and our brain. They have specific receptors that help the body determine how hard we are hitting the ground. They do this through vibration. Natural surfaces such as wood and grass vibrate more than unnatural surfaces such as asphalt. Concrete does not vibrate at all. The more than we have between our feet and the ground, the less feedback we get.

It’s not about how HARD we hit the ground, it’s about whether our body knows how to respond to it through its own shock absorption methods.

Research has shown that the more you put between the foot and the ground, the more force the body absorbs. Peak knee flexion actually decreases, indicating a stiffening of the joints to help absorb the extra load. Think of the body like a spring. You want the body to have a certain amount of rebound. If the spring is too stiff, this can lead to injury. We can show this using the RunDNA 3D Gait Analysis.

Cushioned shoes often have increased overall stack height (the amount of shoe that's under your foot). If you are prone to rolling your foot or already have balance/stability issues, a cushioned shoe can exacerbate this.

Cushioned shoes may be right for you, but we’d suggest reaching out to a running gait specialist to see if it’s right for you, especially if you're considering a change because you're injured.

If you do decide to go with a more cushioned shoe, give yourself time to adapt to the shoe so that your body can adapt to the change in force it is dealing with when you land. Also, remember our email about shoe variety. You can add a cushioned shoe to the mix and see how it goes.

To learn more about our 3D Gait Analysis or how working with a certified running gait analyst can help solve your running issues, please visit our website or simply reply to this email with your questions!

Plyometrics

The final phase of the rehab progression that we discussed a few weeks ago is load management. We discussed loading in terms of return to running. Another way to progress loading is through plyometric training. The primary goal of plyometric training is to keep runners healthy and allow athletes to progress towards other return to sport activity.

Whether you are a runner, a field athlete (football/soccer/lacrosse/field hockey player), an overhead athlete (baseball/softball) or a combo athlete (basketball/volleyball/tennis), plyometric training is an integral part of safe return to sport activity and is often the missing link between strength training and return to full performance.

Plyometrics help to train our bodies to develop greater power and to properly absorb forces, both very important factors in running as well as many other sports. Plyometrics include anything where there is quicker movement and higher impact landing (jumping, hopping, skipping, box jumps, bounding, etc).

What are the benefits of plyometrics?

  • Injury Prevention
  • Improves running efficiency
  • Improves running speed and endurance (yes, endurance!)
  • Increases power and velocity with movement
  • Improves reaction time
  • Improves balance

To simplify: plyometrics help to prevent injury and also help with performance by allowing us to become faster, stronger and more powerful.

Where do I start?

When beginning a plyometric program, it is important to consider your prior level of activity, age, health status, injury history, as well as your overall ability to properly perform the activity. This will help to determine an appropriate starting point.

When evaluating an individual's performance, quality > quantity. Looking at form with the eccentric phase all the way through to landing phase is very important to ensure proper prescription of exercise, proper benefits with training and to avoiding injury.

For our test, the level at which your form starts to deteriorate or at which you are unable to complete the activity correctly, will guide the starting point for your plyometric training program.

What constitutes failure at a specific level of the plyo progression?

  1. Inability to maintain balance
  2. Knees collapse inward
  3. Opposite hip drops during single leg jump
  4. Pain with movement

In the image below, Brianne starts to fail at the depth jump with quick recovery to hurdle jump (she blames that on her enormous amount of SLOW twitch fibers). We would prescribe exercises based upon these results.

How much plyometric training is enough?

Athletes really only need between 60-100 foot contacts per plyometric training session. As a beginner, you should start closer 60 contacts per session and progress up towards 100. Increased number of foot contacts beyond 100 per session does not correspond to an increase in performance.

It is recommended that we perform plyometric training 2x per week to allow adequate recovery time between sessions. You also want to consider this recovery period when scheduling sessions around games or races.

For those that are recovering from an injury, discuss with your PT or doctor when plyometrics may be beneficial to add to your rehab program.

For healthy individuals, beginning a plyometric training program can significantly improve your performance and keep your body healthy.

Strength training for runners

The Key Principles Every Runner Should Know About Strength Training

In working with some of the top runners in the world, I have found that there is one thing they all need for their next break through…consistent strength training for runners! It can be challenging to convince runners that there are other ways to get better at running than more miles, but results speak for themselves. No matter if a runner is looking for a first time or a first place finish, strength training plays a key role.

Let’s start with the pitch that I give my runners when convincing them to start lifting weights, and then let’s dive into key concepts and the biggest mistakes that runners should avoid. There is a lot of misinformation when it comes to weight training, and it is more important to understand why and how to lift weights than it is to find a strength training program with the most Instagram worthy exercises. (we have a plan for you at the bottom!)

Why strength training for runners?

Tinman Elite Warm Up

When I first start working with a runner, professional athlete or not, we talk about their preferences and beliefs about weight training. I have heard it all, so let’s clear the air about a few things first. When done correctly, weight training will not make you bulk up. It takes body builders hours in the gym, months of consistency, and tons of calories to start seeing muscle mass increases. Here is how I explain the reason all runners should do strength training.

Running alone doesn’t lead to stronger leg muscles or significant gains in major muscle groups. While it enhances efficiency, it doesn’t necessarily build strength.  Our body uses the smallest/weakest muscle fibers first and gradually increases the number and size of muscle fibers it needs to accomplish a task as it progressively gets harder. Running does not create a high enough load for a long enough time to stimulate the body to recruit these fibers and thus does not increase strength. When we lift heavy weights with lower reps, our muscles must recruit those bigger/stronger fibers. This makes the muscles we have stronger and teaches our body how to recruit more fibers, allowing our body to be more efficient at running because we use more muscle fibers available that are working at a lower percentage of their maximal strength. Incorporating strength training exercises, especially those that target connective tissues and engage the body in a full body workout, can complement running to improve overall strength.”

If a runners is very interested, I also go into how weight training plays a role in running economy. Many runners have heard how running economy is similar to miles per gallon in a car, but few realize that strength training can significantly increase running economy. If two runners with the same VO2 max ran a race, 65% of the variance in performance could be explained by running economy.

Strength training and your heart

Did you know that strength training can significantly benefit your aerobic fitness? Studies have shown that engaging in a full body workout that includes upper body and lower body exercises can train your heart, enhancing cardiovascular efficiency, which is essential for training for runners. Just because it is not running does not mean that there are not direct benefits for running performance!

Strength training and injury prevention

Our body’s ability to maintain muscle imbalances in check relies on both static and dynamic stability, underlining the importance of cross training.

  • Static stability includes things like ligaments and bones that help to absorb forces and maintain postures.
  • Dynamic structures include muscles and tendons that respond to the stresses we place on the body.

Strength training sessions, particularly those involving body weight exercises and medicine ball workouts, play a pivotal role in injury prevention by bolstering dynamic stability and enhancing the connective tissues’ resilience.

Weighted Calf Raise

Certain studies can also support the role of resistance training for injury prevention. Having a smaller calf size can place a runner at a four times increase of experiencing tibial stress fracture. The Glutes and TFL provide tension in the IT-Band that is essential to avoid bending of the femur that could cause a stress response. The benefits of weight training for runners far exceeds running performance and play a significant role in staying healthy.

Key principles to start strength training

While many runners understand the importance of strength training for runners, figuring out how to effectively incorporate strength training into their regimen can be daunting. Guidance on beginning with two or three sessions a week, focusing on major muscle groups through lower body and upper body exercises, is crucial for a balanced strength training routine.
Here are some key principles and theories that can assist runners add strength training in a safe and effective way.

Training load

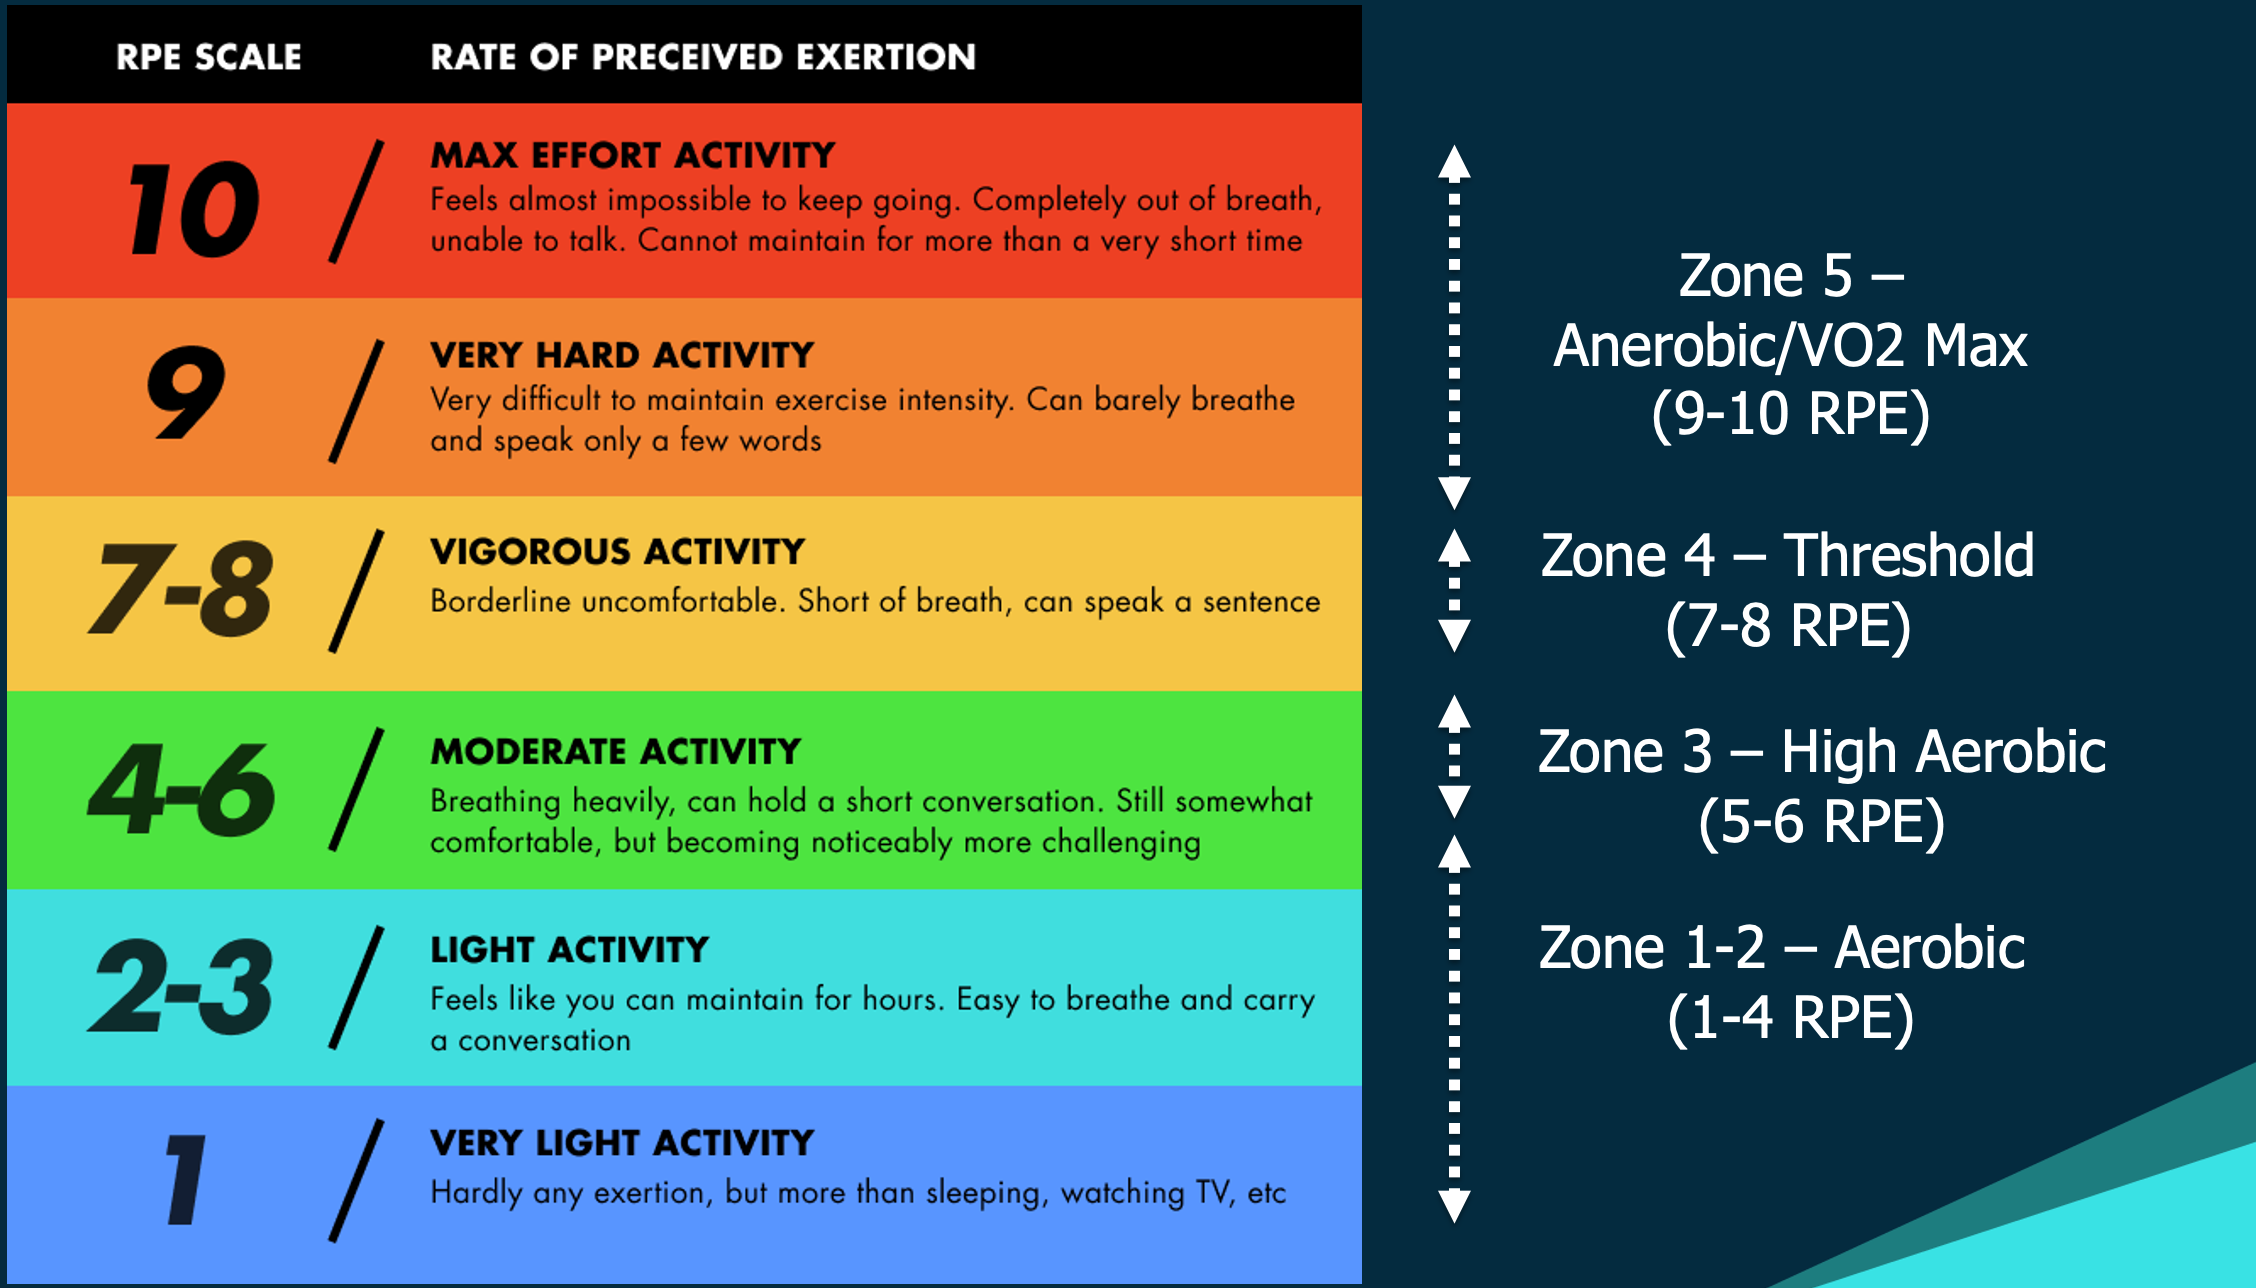
All forms of stress, whether from a long run or a strength training session, are processed similarly by our bodies. This is why we use a method like session RPE at RunDNA, which helps us gauge the intensity of a workout, whether it’s part of a strength training routine or cross training effort, including core workouts and plyometrics. It turns out that our brain is very good at interpreting all of the internal and external factors that affect how hard a workout is.

By using “rate of perceived effort” (AKA RPE, see scale below) and using the duration of the workout, we can assign a score for each activity. When it comes to strength training for runners it is very helpful to be able to quantify the additional work being done by the athlete to know total stress on the body.

RPE Scale

An additional benefit of giving a score to each workout is that we can track progression over time. Research from running and other sports uses session RPE to track Acute to Chronic Workload Ratios. If you have heard about the 10% rule in the past for progressing runs, forget about it! If you progressed 10% a week for 12 weeks you would be doing 2.5x as much as when you started. Acute to Chronic Workload Ratios (ACWR) give an idea of what you have acutely done (~past 7 days) compared to what your body is chronically used to ( past 4 weeks). There is a sweet spot for ACWR to be between 80%-130% to avoid injuries.

We use ACWR is to help prescribe training, but also for the runner to know how much they should listen to their body. If the ratio is high (130% or above) and a runner is having some aches or pains, then the runner may want to modify intensity or duration of that workout. These numbers are not absolute values to say that if you get over 130% that you need to rest, but serve as a gentle nudge to help you decide what is best for staying healthy/consistent while running. The RunDNA App will track this number for you and display it on your dashboard so that you and your coach can see it. For strength training, using session RPE will let a runner who is just starting to lift weights how much additional stress is on their body.

Proper form

Runners are often worried about getting hurt while doing strength training. If a runner gets injured from lifting weights, it is most likely that they don’t have proper form, or they were not ready for heavy weights.

Proper Squat

I highly recommend that a runner work with a personal trainer or other qualified professional to make sure they are doing the lifts correctly. I am a big advocate for heavy weights with runners, but I always preface that with good form being essential before lifting heavy. Runners may want to start with less complicated exercises or go through partial motions if they are not maintaining proper form.

I also typically suggest that a runner start with about 50% of what weight they think they can do on their first weight lifting session. You can always do more next time, but you cannot do less than you did – and it may be surprising with how sore it can make you.

Sets, reps, weights

The sets, reps, and weights chosen in your strength training for runners program should be strategically selected to trigger the desired adaptive response. Runners traditionally were told to do 3 sets of 12-15 reps for muscular endurance. This offers very little additional value beyond the muscular endurance gained from actually running. This is a bit of an oversimplification, but below are sets and reps for the three main goals of strength training:

  • Strength: 1 to 6 reps
  • Muscle Size (hypertrophy): 8 to 15 reps
  • Muscular Endurance: 15+ reps

Whether aiming for strength, muscle size (hypertrophy), or muscular endurance, incorporating exercises like single leg deadlifts and single leg squats can target muscle imbalances and strengthen the major muscle groups crucial for running.

When you select a weight to use for strength training, it is a bit of an educated guess. I start by using a term called Reps in Reserve, and then verify how much weight by using Soreness Rules.

Reps in reserve (RIR) is similar to session RPE from our training load discussion because we are using our perception of the effort to determine what weight to use. This method also accounts for variability across sessions if you are sore or tired from other workouts. RIR basically means how many extra reps could you do before muscle failure. Based on the desired result from strength training, you will use different RIR values. For example, if you want to gain strength you may prescribe 4 sets of 6 reps with 1-2 RIR. How close we get to muscle failure and the time under tension plays a big role in the adaptation our body has. Below is a chart with some basic rep ranges and RIR values based on the goal of the strength training session.

Soreness

Soreness provides excellent feedback about if you selected the appropriate sets, reps, and weights. Soreness should follow the Goldilocks principle. It needs to be just right! If there is no soreness after weight lifting, the load may not be enough to get the desired response. Too much soreness will limit the ability to perform the exercises frequently enough to maximize gains.

The soreness rules below are adapted from an article I published on ACL rehabilitation and return to play. To simplify it even more, I like my athletes to have some soreness but not for longer than 24 hours after a lifting session.

Soreness Rules


Periodization

While I highly encourage runners to lift heavy weights, it is important to mention that runners should not do that all year long. Just like runners periodize their run training, they should also periodize their weight lifting.

If you are not familiar with periodization, it basically means that you have different focus and priority based on the time of year and proximity to your most important event. It is beyond the scope of this article to go into detail about periodization, but the take away is that when it comes to lifting weights you should vary the type of resistance training throughout the year.

Below is an example of periodization that we explain more in our Endurance Coaching Course. Strength training is an important part of any training plan, but the reality is that weight lifting can cause soreness and lower performance. Runners should match the goal of their strength training with the time it takes for adaptation to maximize gains and for allowing max performance with run specific training.

Example Runner Periodization with strength

An example of using periodization for run training AND strength training would be that during a base period in running training (lower intensity but higher duration) a runner would focus on heavy strength training. Since the runner would not be doing high intensity running session, any residual fatigue or soreness after heavy strength training would not impact run performance as significantly. Our Endurance Coaching course covers this extensively for those interested, but the take away here is to plan out the type of strength training to compliment your run training and not just do the same type of workout all year long.

Plyometrics

No strength training routine for runners is complete without incorporating plyometrics.

Jumping for Runners

These dynamic exercises, including single leg hops and straight line jumps, are fundamental for improving neuromuscular coordination and strengthening connective tissues, crucial aspects for enhancing running performance and preventing injuries.

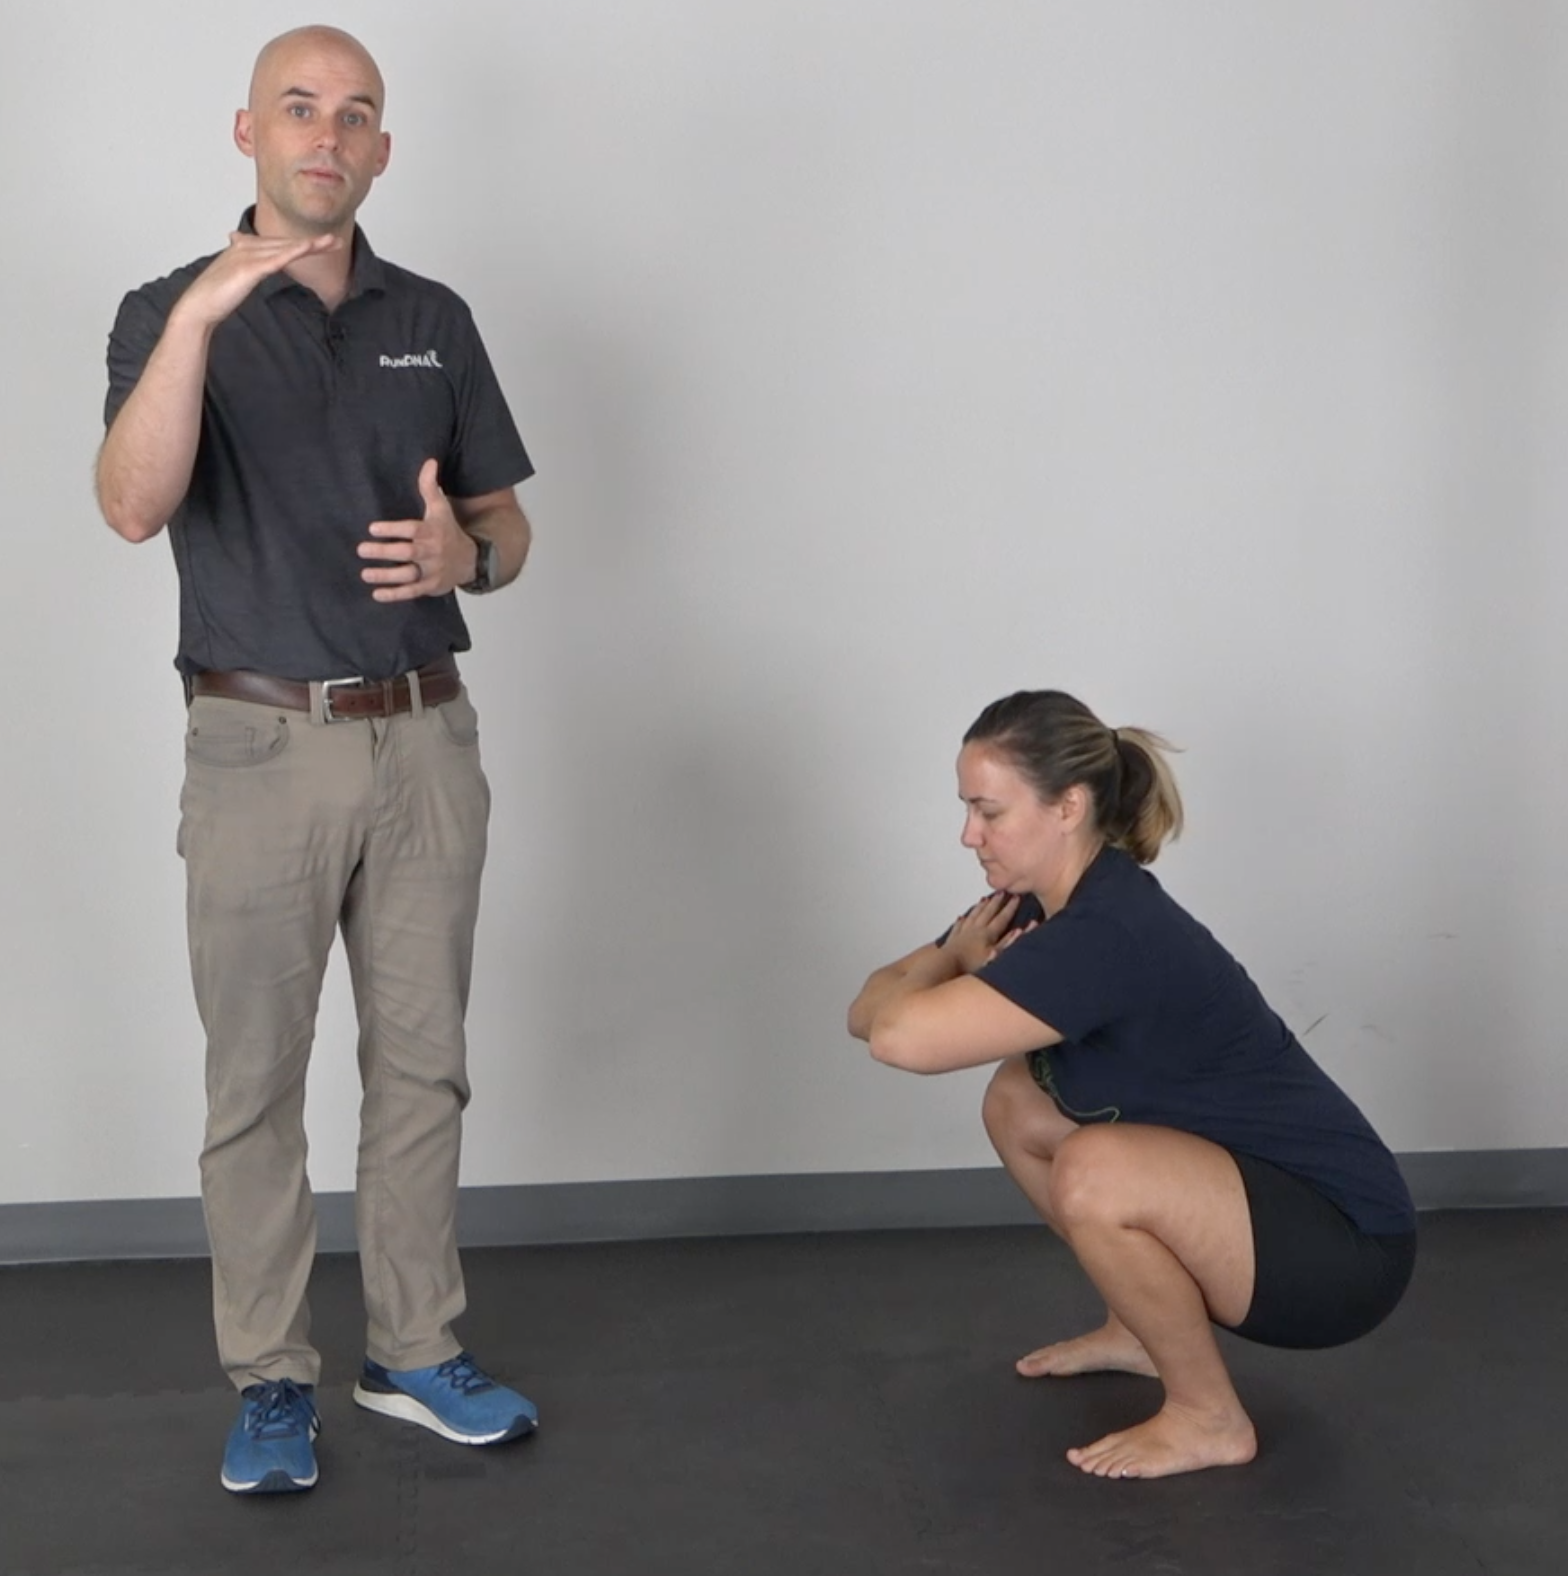
One of our favorite exercises for someone new to jumping is to start with is what I call a depth squat. Check out the video below to see how to introduce a faster rate of force production without the impact.

Here are two quick things when adding jumping. Prescribing jumping is typically done by foot contacts. A foot contact is each time the foot would hit the ground. Early plyometrics should be 50-65 foot contacts and progress to no higher than 150 foot contacts.

Second, don’t forget about jumping rope. This is a great warm up before track sessions to prime the body and get the heart flowing, while developing stiffness/spring in the foot.

Example plan

Below is an example plan that runners can use to start lifting weights. This plan is designed for doing in a gym and ideally the runner would have moderate experience lifting weights. As always, proper form is key and start off with light weights.

General Strength for Runners from Level 2 Certified Running Gait Analyst Course

Summary

Hopefully this article is convincing to add strength training for runners. I am a big fan of “minimal effective dose,” so don’t be intimidated by having to spend hours in the gym. A little bit goes a long way!